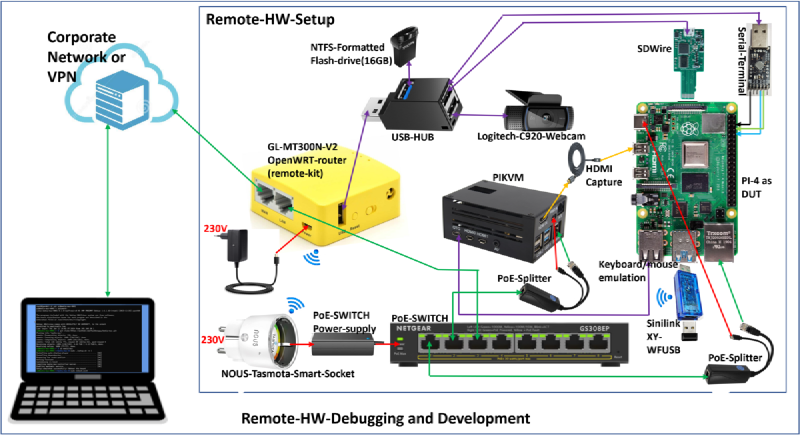
A compact “lab-in-a-box” that turns a $30 GL-MT300N-V2 pocket router into a remote hardware bring-up station. You get serial console, PoE power control, SD card image swapping, USB power cycling, PiKVM video/keyboard, and a camera feed over a single box.
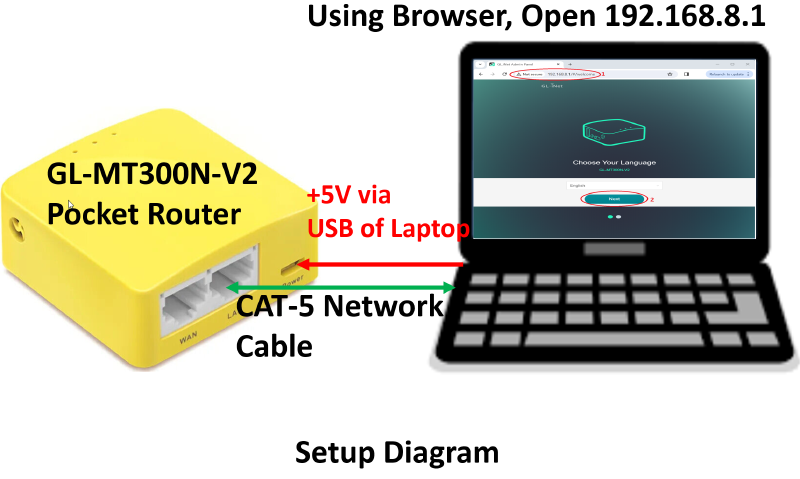
Quick start: Flash the Remote-Kit firmware, log in at http://192.168.20.1, wire in PoE switch + PiKVM, then update port-forwards to match device IPs.
What Remote-Kit does #
- Serial terminal to the DUT over SSH (
screen) - Virtual SD card image loading via SDWire (no physical card swaps)
- Remote USB power cycle (Tasmota-based XY-WSUSB)
- PoE power on/off and power measurements (Netgear GS308EP)
- PiKVM remote display + USB keyboard/mouse emulation
- Optional USB webcam stream for bench visibility
- FTP/TFTP for bootloader RAM loading
System overview #
Security note: Default credentials — Remote-Kit SSH: root / remote-kit-000, PoE switch (GS308EP): password, WiFi SSID/key: remote-kit-000 / remote-kit-000. Change all default passwords before exposing any service to your corporate or public network.
Hardware (Bill of Materials) #
Below is a reference setup for a Raspberry Pi 4 as DUT. Prices are from the time of writing and will vary.
| Item | Qty | Unit Price (EUR) | Notes |
|---|---|---|---|
| GL.iNet GL-MT300N-V2 | 1 | 30 | Remote-Kit router |
| 5V MicroUSB PSU (router) | 1 | 10 | 5V/3A adapter |
| Netgear GS308EP PoE switch | 1 | 90 | PoE power control + measurements |
| 5V PoE splitter (USB-C) | 2 | 15 | Power PiKVM + DUT |
| 3-port USB hub | 1 | 5 | Any basic hub |
| USB flash drive (16 GB) | 1 | 10 | Image storage |
| Raspberry Pi 4 | 2 | 50 | One for PiKVM, one as DUT |
| MicroSD card (16 GB+) | 1 | 10 | PiKVM image |
| Geekwork PiKVM kit | 1 | 85 | PiKVM hardware |
| USB webcam (UVC) | 1 | 70 | Bench visibility |
| Tasmota WiFi smart socket | 1 | 10 | Power control (alt to PoE) |
| USB-TTL serial adapter | 1 | 15 | Serial console |
| Sinilink XY-WSUSB dongle | 1 | 8 | USB power cycle (Tasmota) |
| SDWire (SD card mux) | 1 | 90 | Virtual SD card swapping |
Firmware and services #
- Custom OpenWrt image for GL-MT300N-V2
- Port forwarding for PiKVM, PoE switch, camera, and smart plugs
- SSH access for scripted automation
- Utilities:
screen,ntgrrc, SDWire scripts
Setup steps #
- Flash the Remote-Kit firmware to the GL-MT300N-V2 (source on GitHub).
- Connect your PC to the LAN side and log in to
http://192.168.20.1. - Connect WiFi accessories (smart socket, XY-WSUSB) to SSID
remote-kit-000(key:remote-kit-000). - Wire PoE switch, PiKVM, SDWire, and camera to the LAN ports.
- Change the default GS308EP password from
passwordto something secure. - Update port-forwards in OpenWrt to match your device IPs.
The firmware ships with these default port-forward rules (all via the router’s LAN IP):
| Service | Port |
|---|---|
| OpenWrt UI | 80 |
| USB webcam | 8080 |
| PoE switch (GS308EP) | 8081 |
| PiKVM | 4433 |
| Nous smart socket | 8082 |
| XY-WSUSB dongle | 8083 |
Access points: OpenWrt UI on http://remote-kit-000, PiKVM on https://remote-kit-000:4433, PoE switch on http://remote-kit-000:8081.
Common remote workflows #
1) Load a new SD image onto the DUT #
ssh root@remote-kit-000  #pw: remote-kit-000
root@remote-kit-000:~# wget -O /mnt/sda1/libreelec-image.img.gz https://releases.libreelec.tv/LibreELEC-RPi4.aarch64-11.95.1.img.gz
root@remote-kit-000:~# ntgrrc login --password Remotekit000 --address GS308EP
root@remote-kit-000:~# ntgrrc poe set -p 1 --power disable --address GS308EP
root@remote-kit-000:~# sd-wire-load-image.sh /mnt/sda1/libreelec-image.img.gz
root@remote-kit-000:~# ntgrrc login --password Remotekit000 --address GS308EP
root@remote-kit-000:~# ntgrrc poe set -p 1 --power enable --address GS308EP
root@remote-kit-000:~# #LibreElec will now boot on Pi-4-DUT - you can see this booting from a remote location using PiKVM's WebUI.
2) Power cycle the DUT (PoE) #
ssh root@remote-kit-000  #pw: remote-kit-000
ntgrrc login --password Remotekit000 --address GS308EP
ntgrrc poe set -p 1 --power disable --address GS308EP
ntgrrc poe set -p 1 --power enable --address GS308EP
3) Open serial console #
ssh root@remote-kit-000  #pw: remote-kit-000
screen -R serial /dev/ttyUSB0 115200
4) Simulate Ethernet cable unplug #
ssh root@remote-kit-000  #pw: remote-kit-000
ntgrrc login --password Remotekit000 --address GS308EP
ntgrrc port set -p 1 -s 'Disable' --address GS308EP  #unplug
ntgrrc port set -p 1 -s 'Auto' --address GS308EP     #plug
5) Measure PoE power draw #
ssh root@remote-kit-000  #pw: remote-kit-000
ntgrrc login --password Remotekit000 --address GS308EP
ntgrrc poe status --address GS308EP       #print status in table format
ntgrrc poe status --address GS308EP -f json #print in json formatLarge images: The router has limited RAM — do not decompress multi-GB images on it. For large files (e.g. raspios-bookworm-arm64.img.xz at 2.4 GB): decompress on your PC first, then scp the raw .img to /mnt/sda1/, and run sd-wire-load-image.sh.
Use cases #
- Remote OS image testing for embedded boards
- Regression testing of bootloaders and kernels
- Remote lab access for distributed teams
- Automated power and peripheral cycling in CI pipelines