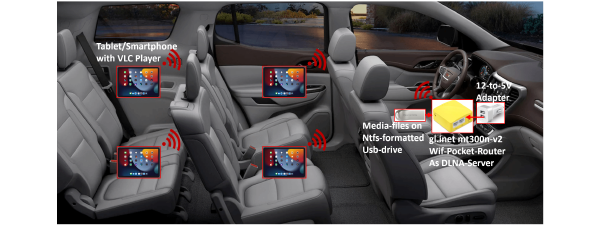

This is version 2 of my multi-screen Raspberry Pi infotainment project. The first version (DIY In-Car Infotainment) required a separate pocket router for DHCP, DNS, and DLNA. This version eliminates that dependency — one prebuilt SD card image works for all terminals, and the system configures itself automatically at boot.
What’s New in v2.1 #
- Touch-friendly OSD controls — New “Sync” and “Stop All” buttons in Kodi’s video player OSD. Tap the screen to show controls, tap Sync to synchronize all screens.
- Master-only visibility — OSD sync buttons automatically hide on slave devices (only visible on master with USB mounted).
- Keyboard shortcut — Press ‘S’ during video playback to trigger sync immediately.
- No startup prompts — Pre-configured Addons database eliminates “Do you want to enable this addon?” popups.
- Accurate device count — Fixed duplicate localhost counting (shows correct 3/3 instead of 4/4).
- Minimal dual-screen setup — Just two Pi4s connected with a direct Ethernet cable — no PoE switch needed for small deployments.
v2.0 features: Self-hosted DHCP/DNS/NTP/DLNA on master Pi, automatic master election via USB detection, one SD card image for all terminals.
Minimal Dual-Screen Setup #
For a quick two-screen deployment, you don’t need a PoE switch — just connect two Pi4s directly with an Ethernet cable:
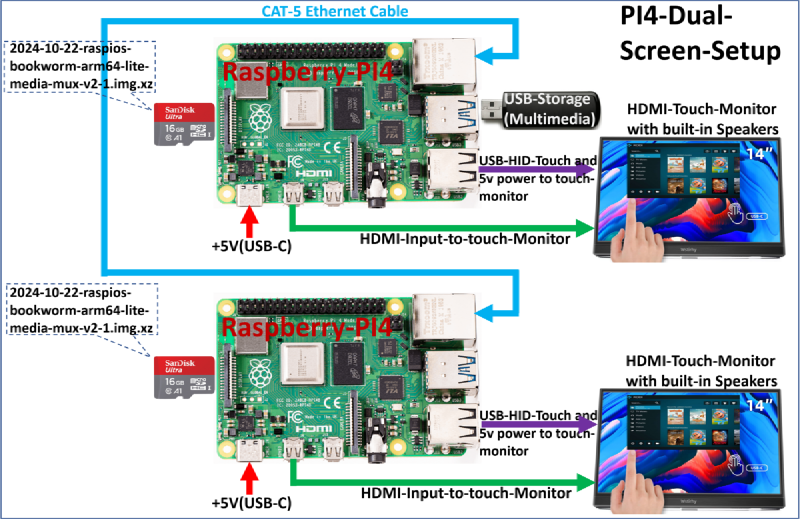
What you need:
- 2× Raspberry Pi 4 with touch displays
- 2× MicroSD cards (same image on both)
- 1× Ethernet cable (any length, crossover not required)
- 1× USB storage with media files
- 2× Power supplies (5V/3A each)
How it works:
- Download the pre-built SD card image (v2.1) and flash it to both cards using balenaEtcher or Rufus
- Connect the two Pi4s with a standard Ethernet cable
- Attach USB storage to one Pi (this becomes the master)
- Power on both — master provides DHCP, DLNA, and NTP to the slave
- Both terminals launch Kodi and show the DLNA media library
From here, use the touch-screen OSD controls to sync playback across both screens.
Scaling up? Add a PoE switch for 3+ screens — see Multi-Screen Setup (3+ Screens with PoE Switch) below.
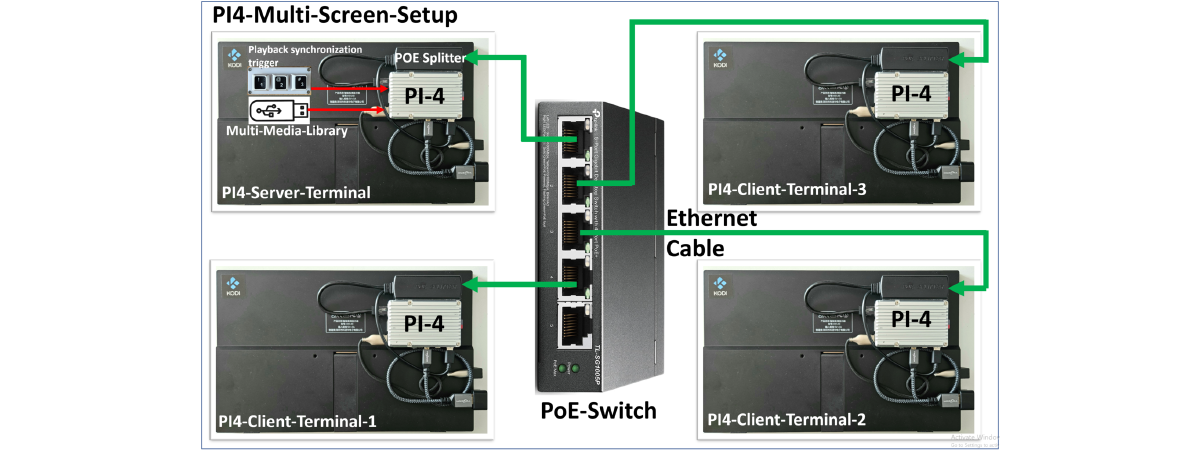
Multi-Screen Setup (3+ Screens with PoE Switch) #
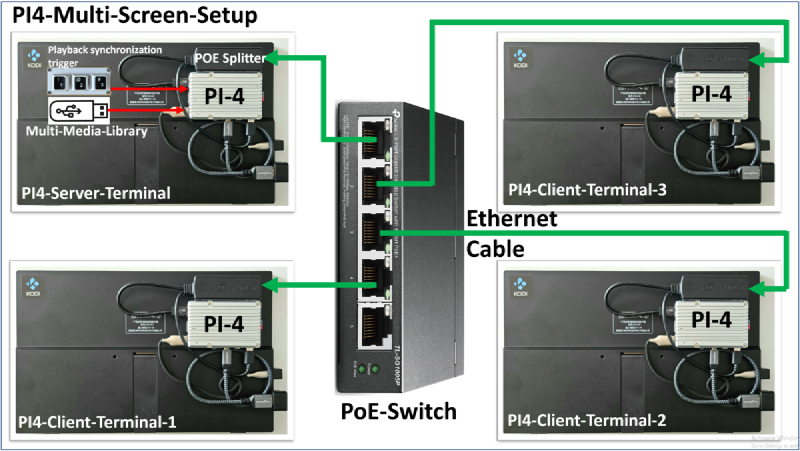
A typical deployment uses:
- 1 master Pi4 terminal (with USB media attached)
- 3 client Pi4 terminals
- 1 PoE switch (5-port or larger)
The topology is a pure star connection: every terminal connects directly to the PoE switch via a single Ethernet cable that provides both power and network. No AV matrix or special head-end hardware required.
How It Works #
- PoE switch powers on
- All Pi4 terminals boot from identical SD cards
- Each terminal checks for USB storage
- The terminal with USB media becomes the master automatically
- Master starts DHCP (192.168.8.100-200), DNS, NTP, and DLNA services
- Client terminals get their IP address, time sync, and media access from master
- All terminals launch Kodi and connect to the DLNA source
- Users choose Personal Mode or Sync Mode
Two Operating Modes #
Personal Mode #
Each user gets their own screen and audio path:
- Analog headset via 3.5mm jack, or
- Bluetooth headset
This feels similar to in-flight seatback entertainment. Each passenger independently browses the DLNA media library in Kodi and plays whatever they want.
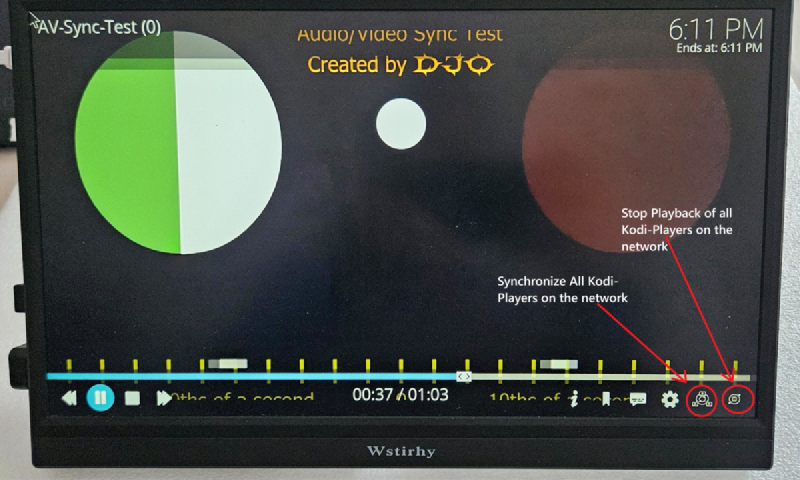
Sync Mode #
When shared viewing is needed, the master terminal can synchronize all clients using touch-screen OSD controls:
- Start playing a video on the master (the Pi with USB storage)
- Tap the screen (or press any key) to show the OSD
- Tap Sync — all screens open the same video at the same position
- Tap Stop All — stops playback on all screens simultaneously
Keyboard shortcut: Press ‘S’ during video playback to trigger sync immediately without showing the OSD.
Non-touch displays? Connect a mini 3-key USB keyboard to the master. Press KEY_1 to sync, KEY_2 to stop all. The OSD buttons are hidden on slave devices — only the master shows them.
Master audio can feed a central sound system (vehicle speakers, room PA, etc.) for group viewing.
Hardware List #
For a 4-terminal setup:
| Component | Qty | Notes |
|---|---|---|
| Raspberry Pi 4 (4GB) | 4 | 2GB works but 4GB recommended |
| PoE HAT | 4 | Official or compatible 802.3af HAT |
| MicroSD card (32GB+) | 4 | Class 10 or faster |
| Full HD touch display | 4 | 7" to 10" HDMI displays work well |
| PoE switch | 1 | 5-port minimum, 802.3af/at |
| Ethernet cables | 4 | Up to 50m runs supported |
| USB storage | 1 | NTFS, FAT32, or ext4 formatted |
| 3-key USB keyboard (optional) | 1 | Only needed for non-touch displays; touch screens use OSD buttons |
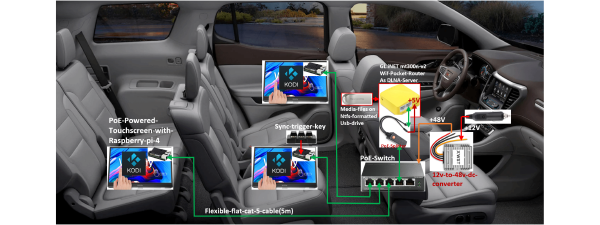
Compared to v1, you no longer need the GL-MT300N-V2 pocket router — the master Pi handles all network services.
Real-World Use Cases #
In-Car / Fleet Passenger Infotainment #
Ideal for vehicles with multiple passengers:
- Each passenger watches independent content with personal audio
- One key press switches everyone to synchronized shared playback
- Master audio routes to vehicle speakers for group viewing
Gives both freedom (personal playback) and coordination (sync playback) in one system.
Multi-Room Shared Viewing #
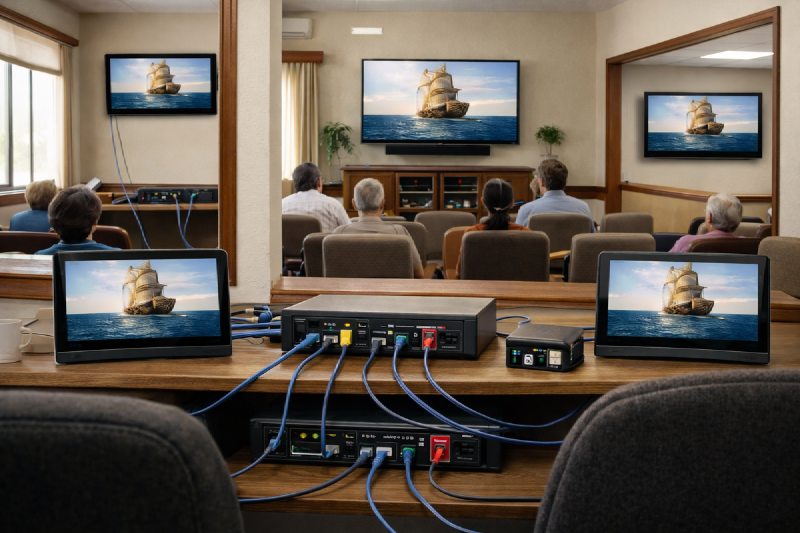
For venues where people are spread across rooms:
- House of worship overflow rooms
- Community halls
- Training centers
- Small campuses
A single PoE star network keeps wiring simple and operations predictable.
Quick Start #
Option 1: Pre-built Image (Recommended)
- Download the pre-built SD card image (v2.1) (~1.2GB)
- Flash the image to all SD cards using balenaEtcher or Rufus
- Insert SD cards into Pi4 terminals
- Connect all terminals to PoE switch
- Insert USB media (NTFS, FAT32, or ext4) into one terminal
- Power on the PoE switch
- Wait for all terminals to boot into Kodi
Option 2: Manual Installation
On an existing Raspberry Pi OS Lite installation:
git clone https://github.com/hackboxguy/media-mux.git
cd media-mux
sudo ./setup.sh
# System reboots after base installation

# After reboot, login again and run:
cd media-mux
sudo ./setup-selfhosted.sh
sudo reboot
Troubleshooting #
DLNA source shows “Couldn’t connect to network server” #
- Check if master terminal has USB media attached
- Verify minidlna is running:
pgrep -f minidlnad - Check master log:
cat /var/log/media-mux-selfhosted.log - Ensure USB is mounted:
mount | grep /media/usb
Client terminal not getting IP address #
- Verify master booted first and has USB attached
- Check dnsmasq is running on master:
systemctl status dnsmasq - Try rebooting the client terminal
Time is wrong on client terminals #
- Wait a few minutes after boot for NTP sync
- Check chrony status:
chronyc sources - Verify master chrony is running:
pgrep -f chronyd
Sync playback not working #
- Ensure you are triggering sync from the master (the Pi with USB storage)
- Touch screen: Tap screen to show OSD, tap Sync button
- Keyboard: Press ‘S’ during playback, or KEY_1 on 3-key keyboard
- Check kodisync log on master:
cat /var/log/kodisync.log - Verify all clients are on the same network (192.168.8.x)
OSD Sync/Stop buttons not visible #
- Buttons only appear on the master (Pi with USB storage attached)
- Slave devices do not show these buttons by design
- If master doesn’t show buttons, verify USB is mounted:
mount | grep /media/usb
USB media not detected #
- Supported formats: NTFS, FAT32, ext4
- Check dmesg for USB detection:
dmesg | grep -i usb - Try a different USB port or cable
Current Limitations #
The system works reliably for practical deployments, but there are areas for future improvement:
- No automatic master failover if master is disconnected
- No web dashboard for status monitoring
- Role is determined by USB presence (no manual pinning)